Please take couple of minutes to read our purchase guide so you know how to buy cars online at AutoFromChina
You May Like
PCI Drone Detection
User Manual V2.0PCI Handheld Drone Detection Jamming Integrated Device
User Manual V2.0Please read this operating instructions carefully before use
Model abbreviation: PCI
Disclaimers & Precautions
Disclaimers
Before using this product, any user should carefully read the relevant user manual and this statement. Once using this product, it is considered as recognition and acceptance of all contents of this statement. Unauthorized disassembly of this product is strictly prohibited. Some details of this document may change with the upgrade of the product software version, and the manual is subject to no further notice.Precautions
- The equipment has a low battery alarm function, and should be charged in a timely manner when it reaches the low battery alarm state to extend the battery life;
- Special chargers should be used for battery charging. After the battery is discharged, it should be charged in a timely manner to avoid excessive discharge and damage to the battery;
- Do not disassemble or open, compress, bend, deform, puncture or break the battery; Removing the battery may cause internal short circuits, which can lead to fire and other issues;
- Do not short-circuit the battery, nor allow metal or other conductors to come into contact with the battery terminals or connectors;
- When the equipment battery is in a non use state for a long time, it should be kept at a certain level of charge (that is, it should be charged once when it has not been used for 2 weeks or more) to avoid damage caused by excessive discharge of the battery;
- While ensuring that the equipment is kept away from ignition sources, it is necessary to ensure that the contact environment is dry and not allow the battery to come into contact with water, otherwise there is a possibility of a short circuit occurring;
- Avoid strong collisions and falls when using, and place in a protective box when not in use;
- After long-term use of the equipment, parts such as buttons and casing may become dirty. Please clean the casing with a neutral detergent or damp cloth. Do not use chemical products that may cause equipment damage, such as detergent, alcohol, spray or petroleum preparation;
- The equipment is designed to simulate a gun, in order to keep the equipment in a reflective state during counterattack, it is necessary to keep pressing the trigger;
- Due to the characteristics of the antenna, attention should be paid to the direction and angle when using the equipment;
- In complex environments with dense personnel/buildings, it is necessary to consider the safety factors of the unmanned aerial vehicle landing point area and use it in a targeted manner according to the environmental situation;
- In windy weather, after all three channels of remote control, navigation, and image transmission are suppressed, the drone will be affected by the wind and drift away in an uncontrolled state. Therefore, the navigation channel should be retained, and the drone itself has the ability to resist risks and can adjust itself to maintain positioning and hovering;
- When equipping anti aircraft drones, it is necessary to ensure that there are no obstacles between the equipment and the drone, otherwise it will affect the anti aircraft effect of the equipment.
- When the device is turned on to strike, the probability of a significant change in the device's battery level display or inaccurate battery level display may occur. After turning off the strike, it can be restored.
1. Overview
1.1 Product Introduction
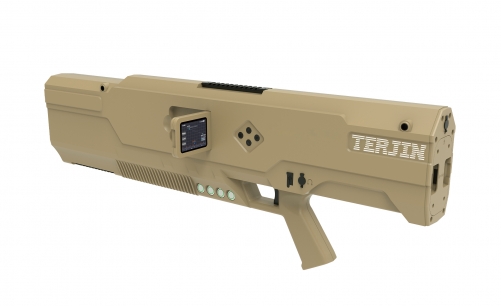
The unmanned aerial vehicle inspection and strike integrated gun, as a portable unmanned aerial vehicle inspection and strike integrated platform, integrates unmanned aerial vehicle detection, model recognition, rough direction finding, position acquisition, and directional strike. Its principle is based on spectrum sensing and artificial intelligence technology to identify and classify the flight control link and image transmission link of UAV, and can conduct rough direction finding and accurate position acquisition for UAV, and can attack the invading UAV based on Radio jamming technology to better guard low altitude safety.Functional Description
- Real time detection function: Equipped with real-time display of detected drone models, operating frequencies, and signal strength.
- Direction finding function: Equipped with DF mode, it can perform DF on unmanned aerial vehicles.
- Location function: The equipment has positioning mode, which can locate some drones, obtain drone and pilot position information, and display it.
- Counter function: The equipment can counter attack drones in multiple frequency bands, launch simultaneously in multiple frequency bands, or strike in different frequency bands according to actual needs.
- Brightness adjustable function: The display brightness of the equipment screen can be adjusted according to the usage scenario.
- Power save set: The equipment has an automatic screen rest function, which can be standby for different time periods set by the user, extending the equipment's usage time.
- Language switching function: Equipment can switch between multiple languages.
- Location acquisition: Equipment can obtain one's own position.
- Data retrieval: Equipment can send detection data back to backend servers through wireless networks.
1.2 Production Configuration
| Serial number | Name | Quantity | Unit |
|---|---|---|---|
| ① | Device host | 1 | Pcs |
| ② | Power adapter | 1 | Pcs |
| ③ | Pluggable battery | 2 | Pcs |
| ④ | Straps | 1 | Pcs |
2. Equipment Composition
2.1 Equipment Composition Description
Device Diagram:
1 2 3 4 5 6 7 8 9 10 11 12 13 14 TERTIN®金
① Strap fixing hole
② Picatine guide rail
③ Screen
④ Function keys
⑤ Battery, SIM card installation holes and power interface
⑥ USB
⑦ Headset
⑧ Frequency band selection button
⑨ Power switch
⑩ Launch trigger
1 2 3 4 5 6 7 8 9 10 11 12 13 14 TERTIN®金
① Strap fixing hole
② Picatine guide rail
③ Screen
④ Function keys
⑤ Battery, SIM card installation holes and power interface
⑥ USB
⑦ Headset
⑧ Frequency band selection button
⑨ Power switch
⑩ Launch trigger
2.2 Operating Instructions
Power On
Press the power switch to enter the startup interface, and wait about 15 seconds to enter the home screen, which includes the detection information display area, equipment status area and counter control status display area.Home Screen
The Home screen is divided into three parts, namely, detection information display area, equipment status area and countermeasure status display area. The details are as follows:- Equipment status area: This section displays the current time, the number of satellite satellites received by the equipment itself, the 4G signal strength, and the battery level from left to right;
- Counter state zone: This section is used to display the status of each firing mode of the anti reaction gun, which includes turning off anti reaction, preparing for anti reaction, and turning on anti reaction;
- Detection information display area: This section will display the detected drone related information, including the identification of the model, frequency, signal strength, and whether it can enter the direction finding and positioning mode.
Note: When the drone information is detected and a red box appears, it indicates that the drone can enter positioning mode; When the drone information is detected and the blue box appears, it indicates that the drone can enter DF mode.
Introduction to Buttons
Function Buttons
Including setting and confirmation buttons, return buttons, and up/down switch buttons.↑
Up Button←
Return Button↓
Down Button✓
Setup & ConfirmPrecautions:
- After making content adjustments, be sure to click the "Settings and Confirm" button again to complete the settings. If you directly press the "Return" button, the content will not be updated after confirmation;
- When entering the direction finding mode, you need to first click "down" to select the drone that needs direction finding, and then click "set and confirm button" to enter the direction finding mode;
- When entering the positioning mode, you need to first click "down" to select the drone that needs direction finding, and then click "set and confirm button" to enter the positioning mode.
Frequency Band Selection and Switch Buttons
This section includes power switch, drive away button, forced landing button, and extended frequency band button. The button is a self-locking switch.⭘
Power SwitchE
Drive away (2.4G/5.8G)L
Forced landing (1.5G)X
Extended band (900M)3. Mode Usage Instructions
3.1 Reverse Mode
3.1.1 Way of Working
A. Drive Away MethodSuppress the drone's remote control and image transmission frequency bands (i.e. 2.4GHz and 5.8GHz), retain the GPS navigation frequency band (i.e. 1.5GHz), and utilize the drone's automatic homing function. The drone is in a homing state and needs to be continuously suppressed during operation. If the equipment operation is terminated during the homing process, the drone will restore the remote control and image transmission signals, and the operator can operate the aircraft.
B. Forced Landing Method
Suppress the GPS frequency band (i.e. 1.5GHz) of the drone, retain the remote control and image transmission frequency bands (i.e. 2.4GHz and 5.8GHz), and the drone will float in the drone direction until the drone is in a slow descent state. If the equipment operation is terminated during the float, the drone will restore the GPS signal, and the operator can operate the drone.
3.1.2 Usage Steps
- When the gun detects a drone, it will display drone related information on the equipment;
- Based on the detection results, press the corresponding frequency band button and select the corresponding strike frequency band;
- Point the gun head towards the direction of the drone, press the trigger to achieve control purposes (drive away or forced landing). After pressing the trigger, the interface will display the activation counter, and the corresponding reflection frequency band will turn red.
4. Product Parameters
4.1 Safety and Standards
| Model | PCI |
|---|
4.2 Electrical Characteristics
| Overall Power Consumption | ≤ 320W (Reverse full open) ≤ 25W (Detect only) |
|---|---|
| Charging interface | DC 5.5-2.1 |
| Endurance | ≥ 0.5h (Reverse full open) ≥ 8h (Detect only) |
| Charging time | ≤ 3.5h |
4.3 Mechanical Parameters
| Size | L*W*H: (850mm*88mm*292mm) ±5mm (host) |
|---|---|
| Weight | ≤ 5kg (Including battery) |
4.4 Battery Parameters
| Nominal Capacity | 5200mAh |
|---|---|
| Nominal battery capacity | 124.8Wh |
| Discharge Voltage | 24V (nominal) |
| Charging Voltage | 29.4V |
| Battery type | lithium battery |
4.5 Packaging Parameters
| Protective box size | L*W*H: (942mm*400mm*144mm) ±2mm |
|---|---|
| Net weight of protective box | 5.9kg |
5. Battery & Charging
2.4 Battery Description
There are two charging methods for batteries, namely individual charging and standby charging. The following will explain the two charging methods.Note: When charging in both ways, the power adapter will light up red and turn green when fully charged.
 USD
USD EUR
EUR AED
AED


